http://www.canoeridgecreations.com/2012/04/festival-of-half-square-triangles-linky.html
I'm linking this post to the Festival of Half Square Triangles, won't you vote for me?
Here's the link to the official website for the Quilts of Valor. There is a lot of information about the group which exists to cover our returning wounded soldiers in a quilty hug.
There is a place to search for a local drop off site and boy are there a lot of places registered. If your local quilt shop isn't on the list, you could encourage them to become a partner with Quilts of Valor by becoming part of the Under Our Wings program. Here, quilt shops put on workshops where experienced quilters work with rookies to teach them how to quilt and make a quilt of valor in the process. Win, win, win! The quilt shop gets a new customer, Quilt of Valor gets a quilt, and a new quilter is born :)
My local quilt shop, A Quilted Heart started this program last year and had a great turnout. They have become a drop off site for Quilts of Valor. Of course, we have Travis Air Force Base locally too where most of the returning wounded come through on their way home to any west coast destination. We have a great group of people who meet them every day of the week as they pass through the base and give them goodie bags filled with home made treats and of course quilts when they have them, but you can bet they could use way more quilts than we can make.
Quilts of Valor has some specifics for the quilts that are donated.
size: Top: Width 55” to 72” by length 65” to 90” and if you are donating the top to be quilted, you should give a backing that is 4 inches bigger on all sides. There are long arm quilters that will quilt and even bind for you, so if you love to make tops, but don't like to quilt or bind, QOV is a great program!
Just search the website for their longarm services and find a match for your quilt.
They also ask that you provide a pillowcase (presentation case) to go with the quilt. There are lots of great, easy patterns out there on the net and I've worked with high school students to make hundreds in only a few hours so you know they have to be easy.
Before my quilt shop started their QOV program, I was sending all of my donation quilts to Alycia in Colorado. She has quite the system going. Some people send her quilt tops, some finished quilts, some just pillowcases. If you can't find any place close to you to send your finished QOV, I recommend Alycia. She knows what to do with a quilt :)
Ok, now on to what you've been waiting for, today's tutorial for making a QOV that is quick and easy so you can crank out lots of these for our returning heroes.
Anyone who knows me, knows that I love tshirts. Some may say I'm addicted. So, when I got asked to do a blog post about Quilts of Valor, I thought how can I use my Accuquilt Go! and make a quick, easy quilt at the same time, plus share my love of tshirts? Well, I think I have fused them all together in this quick, easy tshirt QOV!

Cut off the arms and neck of the shirt and rough cut the shirt so it will be flat. You want to make the biggest square or rectangle you can out of the design. Each design will be a different size, but that's ok, because you will add fabric around it to make it come up square.

Fuse lightweight interfacing to the back of your tshirt, bigger than you will be cuting the square. Follow the directions on the interfacing. This is the kind I used. I got it on sale at JoAnn's.
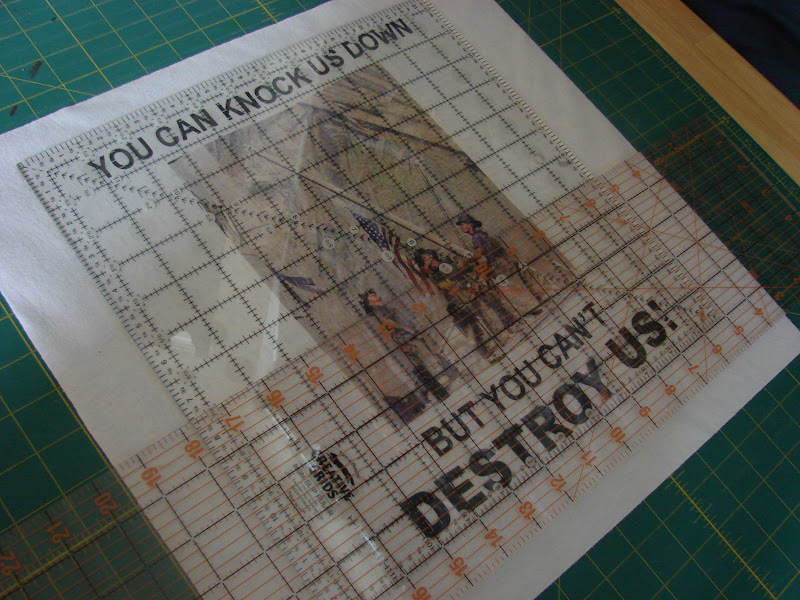
Cut your tshirt using a ruler and rotary cutter into a square or rectangle. You want to keep all of the design, but leave enough space around it for the seam allowance.
I made mine 14 1/2 inches because the design on the shirt was just about 12 1/2 inches. You can see that I have a 12 1/2 inch ruler and used that as my guide. I used my long ruler and laid it on top. It didn't slip, but I was very careful when cutting. I wish I had a giant lazy susan, spinning type rotary cutter mat, but I don't, so I had to move my tshirt around to get it cut square. Just take your time and it will work for you too.

Choose fabrics that will match the design of the shirt you picked. Since mine is patriotic, I'm going to use red, white and blues, but a Quilt of Valor doesn't have to be in those colors. Most returning soldiers are men, so try and make your quilt something a guy would like, but there are a few women in the service as well. If you make a quilt for a woman, trust me, a woman will get that quilt, especially if you send your quilt to Alycia :) She is really good at making sure the quilt gets to the right person. I've been reading her blog for a few years and she is amazing!
I cut a 3 1/2 inch border and a 2 inch border for the tshirt to build it up to 20 1/2 inches, but whatever size you cut the tshirt, you will have to do some math to make your inner square 20 1/2 inches so the rest of the quilt works out.
Then, pick your design for the blocks. I LOVE making 1/2 square triangle blocks with my Accuquilt Go! fabric cutter, so decided on some pinwheel blocks using my 4 1/2 inch half square blocks. What I LOVE about making blocks using this die is it cuts off the dog ears and makes one less step because there is no squaring up the block after sewing. Everything is so easy to match up. If you are really smart, you will lay your red and blue fabric on top of the die with right sides together and you don't even have to match up the fabric after it is cut. Of course, I'm not quite that smart, so I had lots of matching to do, but that's ok because that is part of my fabric therapy. I love the feel of fabric and it helps me to de-stress at the end of a long day of teaching teenagers! Whew, they can take a lot out of you. Some days, they just suck the life out of me and playing with fabric helps put some of that life back.

You also need 4 2 1/2 inch strips of yellow for the inner border and 6 2 1/2 inch strips for the binding. I used 3 1/2 inch strips for the blue outer border.
Now, when the quilt is all finished up, I find that it is too small to meet the national requirements for a QOV :( It finishes at 48x64 and needs to be 55x65. So, what's a girl to do? Well, I love the look of this quilt. This one is going to a dear friend who serves our local returning wounded. I know she is going to love this quilt, and I'm going to make another one, just bigger!

Here's some links to other blocks you could make for your QOV's. They all use 1/2 square triangles.
http://www.accuquilt.com/go-block-7-pieced-star.html
http://www.ideas-for-quilting.com/lemoynestarquiltblock.html
http://www.multi-patch.com/html/lemoyne_star_pattern.html

Here's the second quilt I made. It isn't finished yet, I'm going to give it to my friend Carla to quilt for me, first because she is an awesome quilter (and if you need someone to quilt for you, she is awesome and quilts for hire and does a great job and is inexpensive and super quick and has a fantastic robotic machine, but can also do freehand quilting) and second because she does QOV quilts and third because she is such a great friend. Maybe that should be first. She is my partner in crime and keeps me out of trouble (or gets me in trouble!) Plus, her machine can handle bigger quilts easier than mine can and she can do some fancy quilting patterns with her robotics. I'm trying to get my son to design a robotic device for my machine, and I think by the time he graduates high school he will have come up with something!
Ok, on to the quilt. It is almost the same design as the first, I just put some more sashings in it.
1. You will need two pieces like this with the yellow strips being 2 1/2 inches. You can use your GO! cutter to cut the strips, or just cut them with the rotary cutter. (Don't you love the feet in the picture? I don't have a good place in my house to take pictures and I'm too lazy to crop my pictures)
 |
| step 1 |
2. Next you need TWO strips like this. At first, I made 4 strips like this, but then I had to unstitch two of them. If only I had EQ7, I could have figured this out ahead of time, but alas, I did things the old fashioned way and stitched and unstitched things a couple of times. It's ok. One day I will get the computer program, now that I know how much fun designing my own quilts is!
 |
| step 2 |
3. You also need two strips like this. In each of these pictures, the yellow pieces are 2 1/2 inches by 8 1/2 inches. You can plan ahead and cut the strips 8 1/2 inches, or you can be lazy like me and sew the pinwheel blocks to the long strips of yellow fabric and then just cut them all off at the sewing machine.
 |
| step 3 |
4. You need to build up the center block by adding borders to it. The center block needs to measure 28 1/2 inches. I added a 3 inch blue, 2 1/2 inch red and 2 1/2 inch yellow strip and a 1 inch red strip to the 14 1/2 inch t shirt block. I didn't plan this, but I really can't do math to save my life. I had to add that last 1 inch strip because I miscalculated, but I love that tiny bit of red border inbetween the yellow and the pinwheel blocks so I'm glad I messed up my math. You can do whatever combination of strips you need to make your finished block 28 1/2 inches total. This was the back of the first shirt from the first quilt. I just love this saying!
 |
| step 4 |
5. Now you need to add the 3 pinwheel block strips to the sides of the center block.
 |
| step 5 |
6. Then add the top and bottom 5 strips to the center block.
 |
| step 6 |
I added a yellow border all the way around the center pinwheel section and then added the top and bottom pinwheel strips. The yellow border is 2 1/2 inches. I finally added a 4 1/2 inch outer border. I didn't have enough of the final border to go all the way around so used what I had and added a different bottom border, but I like the way it looks.
I can't tell you exactly how much of each fabric because I'm using up lots of different scrap fabrics.
 |
| I'm so happy with the final product. I'm glad I had to make a second quilt! |
 |
| Here is the finished quilt top, measures 57x72 1/2 Would you like to win a prize? Leave a comment and I will pick a winner on Sunday, April 8 around noon. Be sure to link to your blog (if you have one) so we can all check out your latest quilt adventures and see what you have been up to. Prize will be 4 1/2 inch half square triangle Accuquilt Go! die mailed to you after the contest ends. This die works with the Go! baby or regular Go! US residents only. And be sure to visit here to get the details on the QOV challenge. You can enter quilts, quilt tops or just blocks for a chance to win even more prizes, including an Accuquilt Go! Baby and 5 dies of your choice from Accuquilt. Lots of other great prizes too. That contest ends May 31 so lots of time to make a quilt and enter the challenge and help support our troops. Be sure to visit all of the other bloggers on the hop
April 2: Barb Gaddy
April 3: Gene Black, an Alabama Artist and Quilterhttp://bejeweledquilts. April 4: Marjorie’s Quilting Bee – will also be Blogger Spotlight for Accuquilt http://b-quilts.com/blog
April 5: Marilyn Lewis That's me :)
http://northhillsquilter.
April 6: Linda Alexander
http://living4quilting. |
17 comments:
Love this quilt - I make a lot of t-shirt quilts, but never thought to use one for a center of a quilt. Great idea.
I love this blog! Thanks to all who make these awesome quilts for the women and men who serve our country!
What beautiful quilts and a great tutorial. Thank you. Inspirational. I now want to make a quilt like yours. Love it!
And, thank you for all you to do help others. Big Quilty Hug!
SewCalGal
www.sewcalgal.blogspot.com
Those are great looking quilts!
Thanks for the inspiration.
Great quilt idea and I love the tip for the cutter to put the pieces in together so you dont have to match. Sure could use this die :)
Great tutorial! Thanks for sharing! I would love the die! Thanks for the chance to win!
Great, great ideas!! Keep me out of the draw - just wanted to say how impressed I was with your post!! Very nice :)
That is just fabulous, I sooo love what you have done!
What a great quilt!! Thx for the inspiration!! Love the t-shirt idea!
Thanks for the double tutorial. It's one that I know I'll return to read again. Thanks also for the lovely giveaway. I've been catching up on the blog hop today.
Thank you for a great tutorial. I love the way you used a t-shirt design as the focal point. It is a great cause you are supporting and benefits so many of our sons and daughters. Thank you.
That is a very attractive quilt, and a wonderful idea. I'm going to look at the thrift store with different eyes when I go next week! Thank you, and thank you for all the quilts and tops you make for the soldiers.
desertskyquilts.livejournal.com
I really like your quilts! Thanks for sharing the info about using t-shirts. Good to know. :)
quiltyascharged.blogspot.com
Great idea on using the T-shirts. Your quilts turned out wonderful! I like both of them and I know the recipients will too! Good job on the tutorial too. I don't have EQ7 or any EQ for that matter and I do it the hard way too. Sometimes I have to fudge too but that's where the design element shows up! Your red strip looks great.
Oh my goodness like how easy is that!!! Wonderful to show us this! Thank you!
Love the idea. Thanks for sharing.
great idea thanks for sharing
Post a Comment